A worker is checking the inventory on site
accounting

Common QuickBooks inventory accounting mistakes

Inventory, like payroll, is consistently one of the most problematic areas for clients. A rigid set of procedures, with everyone inputting data consistently and in a timely manner is crucial. This often opens an opportunity for training.


The fundamentals of inventory tracking should be reviewed initially. Here are three considerations:

  1. Evaluate whether the Inventory items in QuickBooks Desktop are set up properly. Clients often set up items with the item type of Inventory Part, when they would be better served using the Non-inventory Part item type. Non-inventory items do not keep a perpetual count or an average cost.
  2. Evaluate whether the total inventory value on the Inventory Valuation Summary report agrees to the inventory amount reported on the Balance Sheet for the same date. Disagreement between these two reports can be caused by several factors. The Client Data Review (CDR) tool, available to your clients’ External Accountant users, as well as those of you using QuickBooks Accountant Desktop and QuickBooks Enterprise (all editions), can assist with this problem.
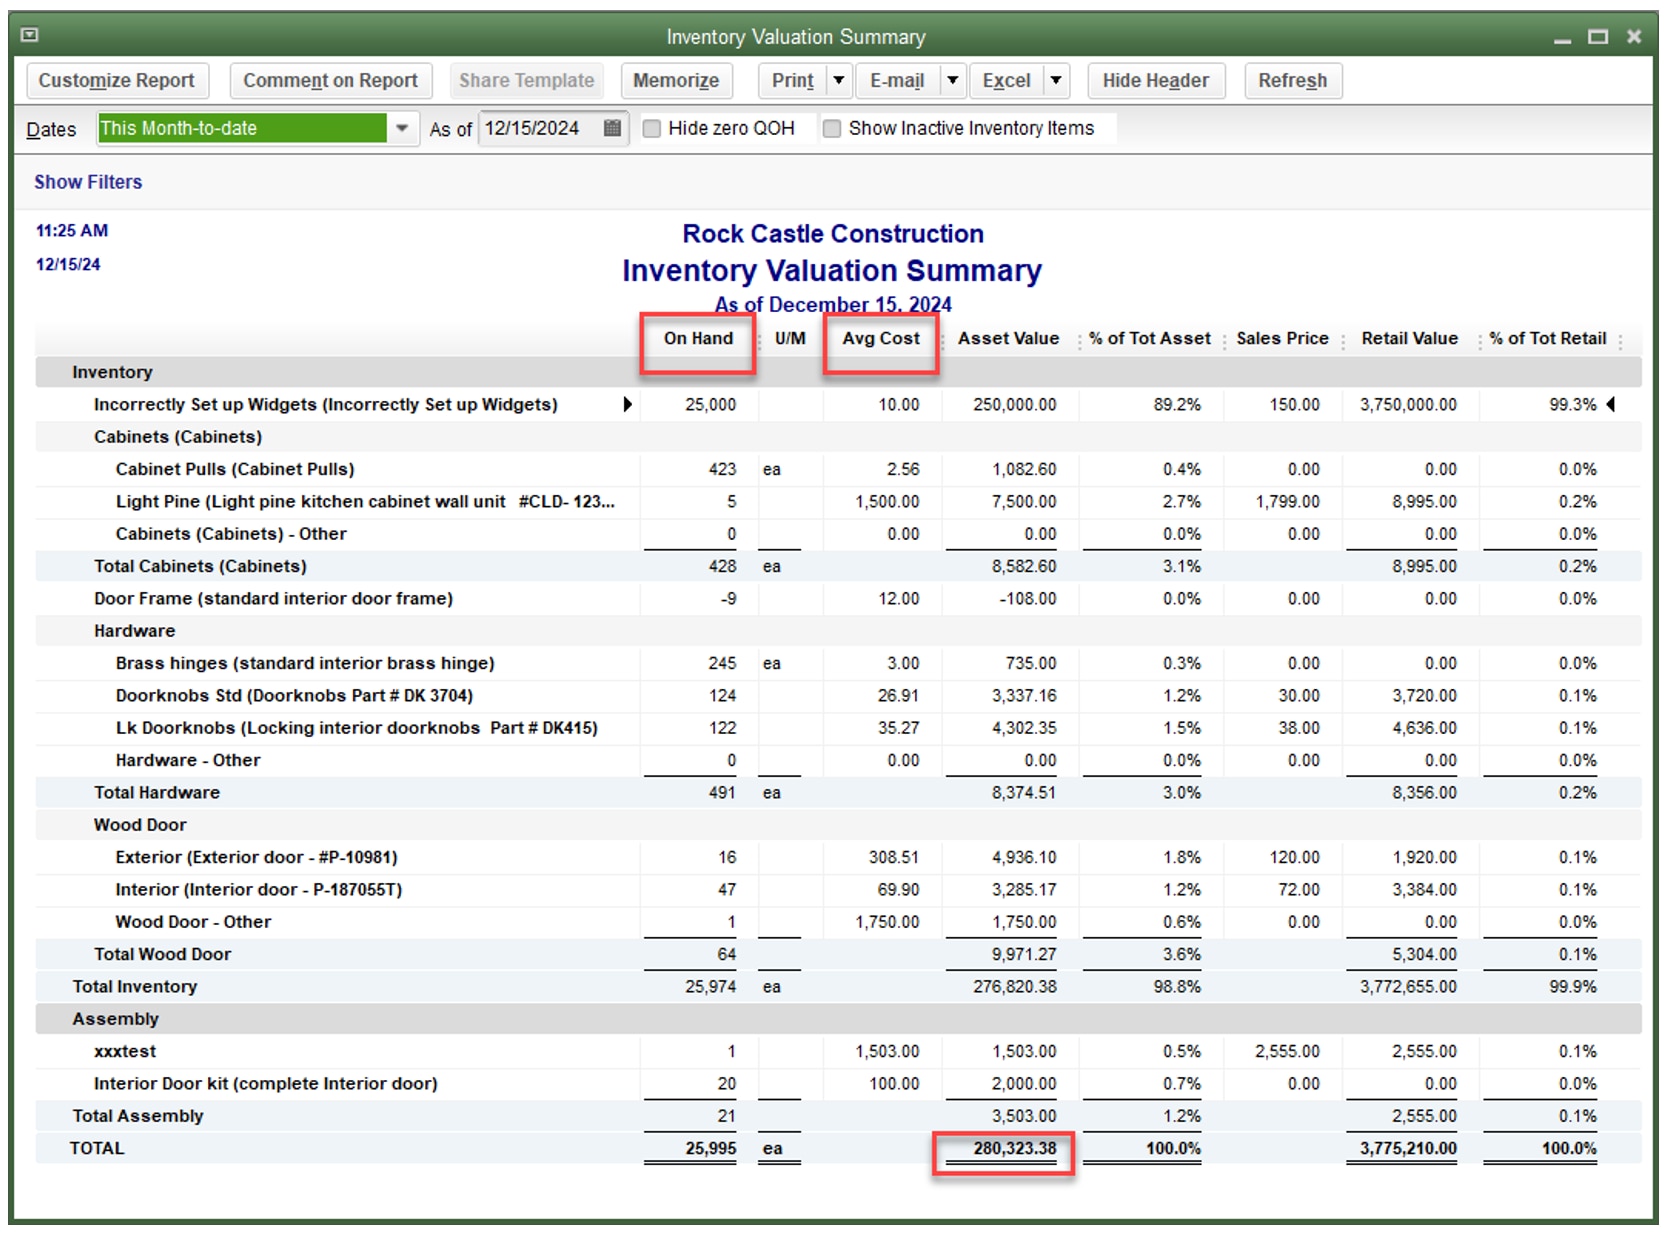
  3. Review the Inventory Valuation Summary for negative quantities and inaccurate average costs.

For the purposes of this article, all future mentions of QuickBooks will refer to QuickBooks Desktop.

Common error: Incorrect and/or inconsistent inventory accounting

Symptoms

  • Inventory Valuation Summary report shows negative quantities
  • Inventory Valuation Summary does not agree to General Ledger
  • Average cost and/or quantity on hand appear incorrect

CDR tool – Compare balance sheet and inventory valuation

The method used in QuickBooks for inventory valuation is weighted average costing (the exception is QuickBooks Enterprise, which, if Advanced Inventory is used, can be set for FIFO costing). An Inventory Valuation Summary Report summarizes the quantity, average cost, and extended value of each of the inventory quantities and provides a total inventory valuation. The total asset value on this report should match with the Balance Sheet value for Inventory; just ensure these two reports were created with the same time/date settings if other users are entering data in QuickBooks at the same time.

If journal entries or deposits (or other transactions using the Expenses tab rather than the Items tab) have been posted directly to the inventory account, the Inventory Valuation Summary will not agree with the Inventory Asset balance on your Balance Sheet. Unfortunately, there is no warning to stop or at least slow down someone entering transactions directly to the inventory account when they should be using inventory items and quantities.

Additionally, inactive inventory items with Quantity On Hand (and a corresponding asset value) will also cause a discrepancy between the Inventory Valuation Summary report and the totals for the inventory asset account on the Balance Sheet or Trial Balance. To correct this problem, re-activate the inventory item, create an inventory adjustment (as discussed below) to zero out that item’s quantity, and then inactivate the item again.

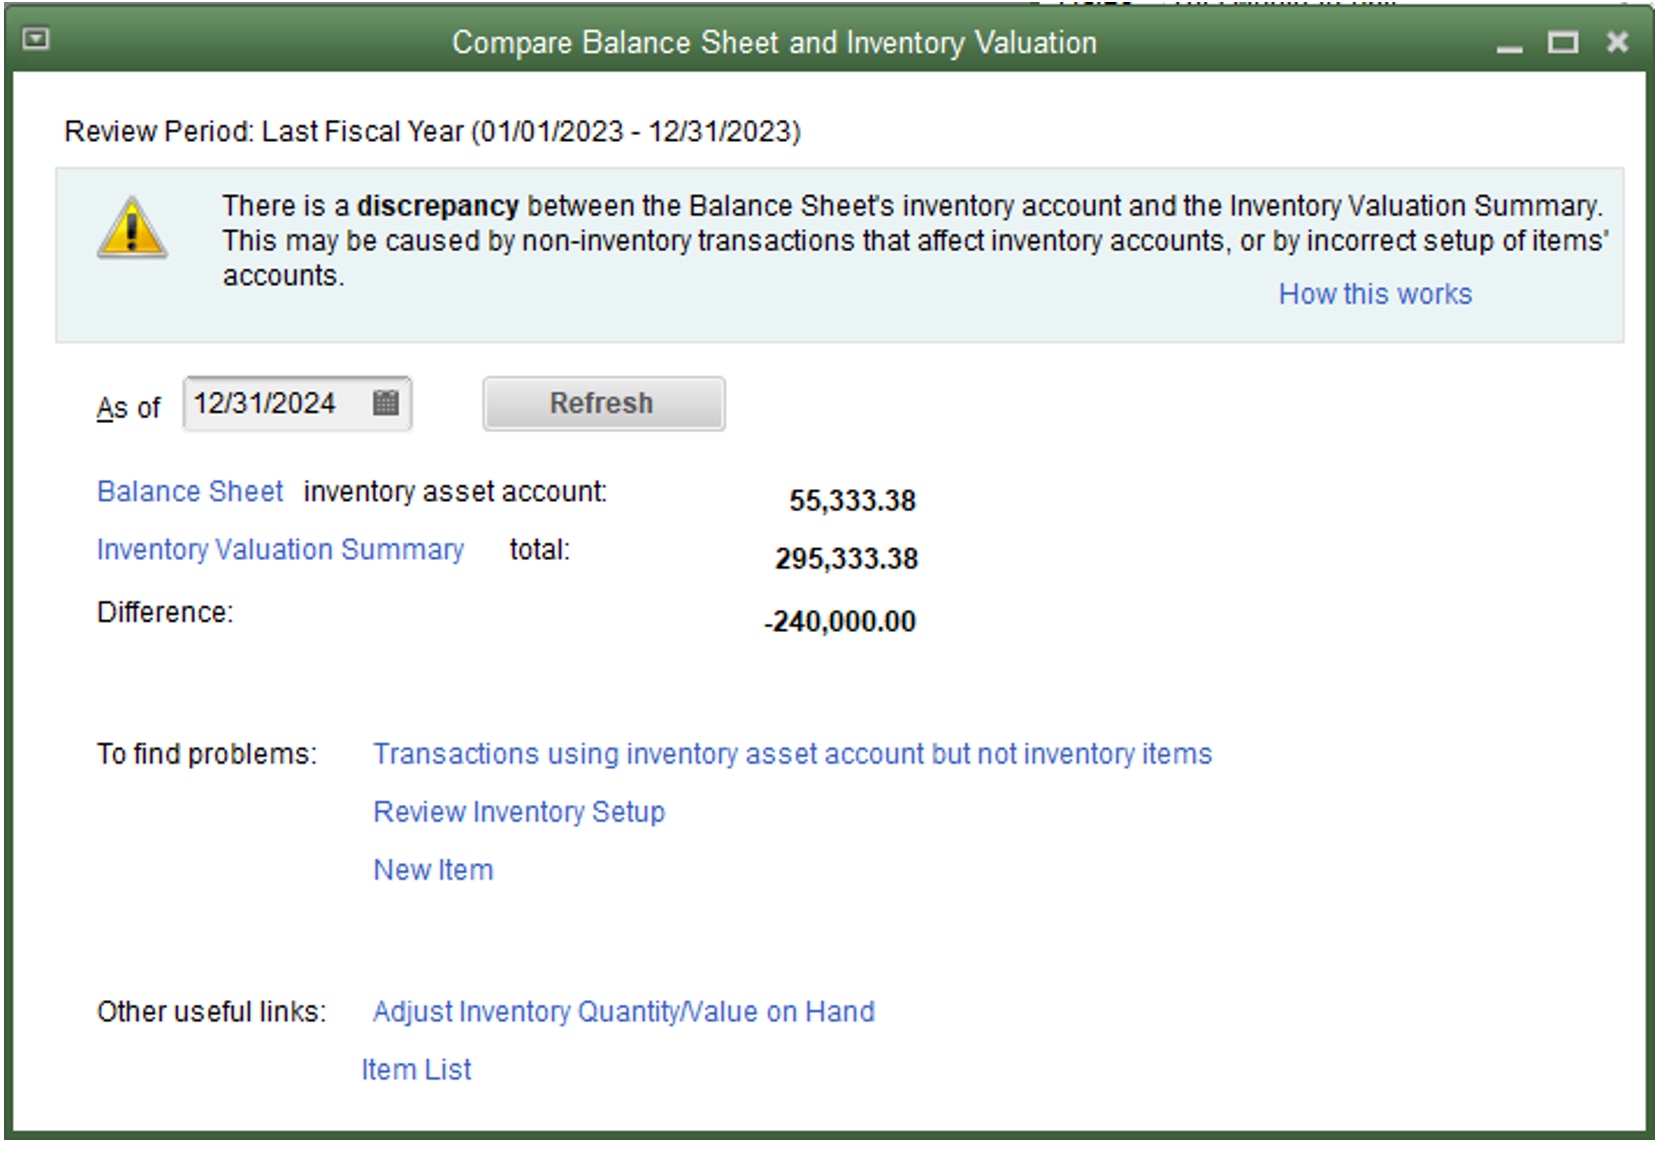
The Compare Balance Sheet and Inventory Valuation tool within CDR determines whether the inventory account on the Balance Sheet and the Inventory Valuation Summary match. The tool compares the inventory general ledger account with Inventory Valuation Summary and displays the results.

A green circle indicates that the inventory account in the general ledger agrees with the Inventory Valuation Summary.

A yellow warning triangle alerts that a discrepancy between the inventory general ledger account and the Inventory Valuation Summary exists. The major cause of this type of discrepancy is non-inventory accounts affecting inventory transactions due to the incorrect setup of accounts for inventory items.

The default date for the comparison is the last day of the review period specified in the CDR. The date in the As of field can be changed and then Refreshed to narrow down the date when the discrepancy occurred.

Common QuickBooks inventory accounting mistakes

If the tool shows a discrepancy, links are provided to items that can help resolve the problem.


One thing to note about this comparison tool is that if any inventory items with quantities and values on hand have been made inactive, the Inventory Valuation Summary dollar amount in this tool will include any inactive inventory items and related values. (This is despite the fact that an actual Inventory Valuation Summary report displayed for the same date will exclude any inactive inventory items and their values.)

Links to the balance sheet and inventory valuation summary 

A link to a report that shows Transactions using an inventory asset account but not inventory items allows you to see a report that lists all transactions (such as a journal entry, check or bill) posted to the Inventory Asset account that did not affect an inventory item. For checks or bills, the transaction should be edited to include the inventory item on the Items tab and the transaction information on the Expenses tab removed. If a journal entry posted to the inventory asset account, then the journal entry needs to be deleted or voided and an inventory adjustment made for the appropriate item.

There are also links to:

  • Review Inventory Setup, which brings up the Add/Edit Multiple List Entries window filtered for inventory parts.
  • Adjust Inventory Quantity/Value on Hand.
  • The Item List.

CDR tool—troubleshoot Inventory

Improperly recording the purchase or sale of inventory items in QuickBooks can cause many problems. Having a negative quantity for an inventory item is also a problem that can affect how QuickBooks calculates average cost. Identifying the specific item and/or transaction that caused the negative inventory situation can take a considerable amount of time.

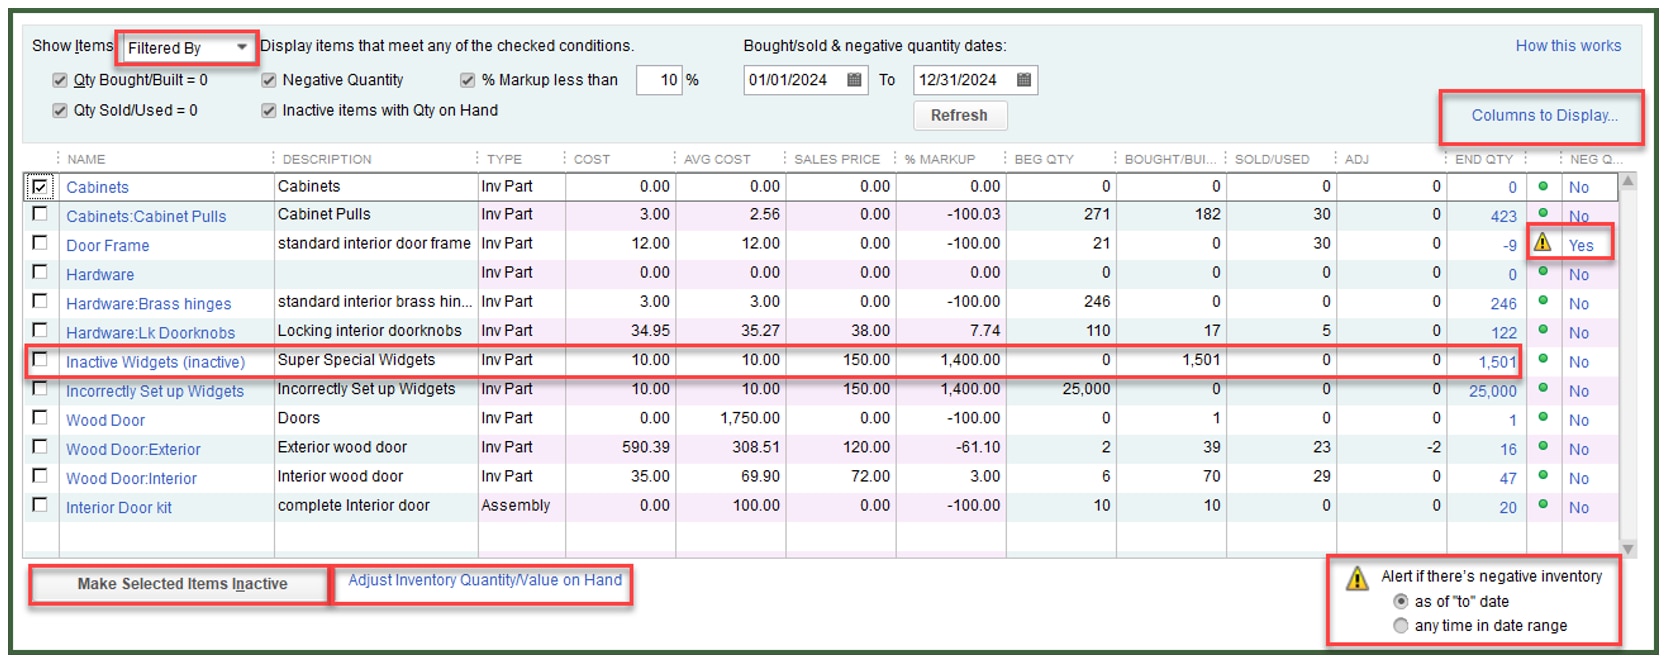
The Troubleshoot Inventory tool will help find inventory errors. A column in the tool displays a Yes if a negative value occurred as of the end of the period (or at any time during the review period if that alert option is selected). Another column shows inactive items that have a quantity on hand and another column shows items with a percent of markup that is less than the amount specified.

Common QuickBooks inventory accounting mistakes
  • Tool OptionsThe item list is show in spreadsheet format. Filter options are displayed on the top left. The Columns to Display option is on the top right and a link to the Adjust inventory Quantity/Value on Hand adjustment window is located at the bottom of the window.
  • Filter OptionsItems can be filtered for all inventory items (including assembly) or only active items, Negative Quantity, Inactive items with Quantity on Hand, and a % of Markup less than a specified percentage.
  • Mark Items as InactiveItems can be marked as inactive directly from this window. Check mark which items you wish to mark as inactive and then click Make Selected Items Inactive.
  • Negative InventoryNegative Inventory is indicated by a yellow warning sign and a Yes message in the far-right column. Double click on the amount showing as negative and the Inventory Valuation Detail report for that item appears. Note: this tool does not have the ability to fix negative inventory automatically as the fix can vary from situation to situation. However, an adjustment can be made to the inventory items by clicking the Adjust Quantity/Value on Hand link on the bottom of the window. Negative inventory alerts can also be displayed by the As of date or Any time in date range by selecting the desired option in the bottom right corner of the window.
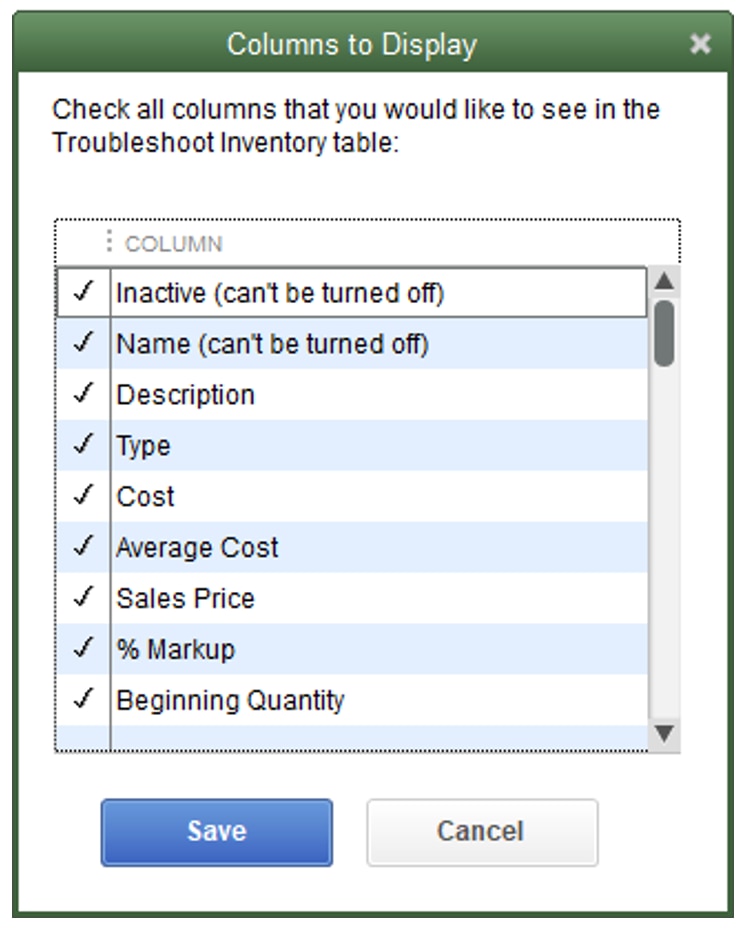
  • Customize ColumnsClick on the Columns to Display link to customize the format of the spreadsheet. Note: by default, all available columns are marked so the available columns are displayed and unwanted columns can be removed easily from this window. To remove a column, simply click on the checkmark next to the column name and click Save.
Common QuickBooks inventory accounting mistakes

Inventory accounting fixes

Items overview

Within QuickBooks, an item can be anything bought or sold by the business. Think of an item as anything that you will purchase and then later sell. The item is the underlying link between invoices and bills or checks to the general ledger. Sometimes a multitude of items are needed for small variations with regards to items sold, and sometimes one generic item will do when the item sold is actually slightly different each time. That determination is made based on the level of detail needed by management and the potential differences in cost of the items purchased and sold. For example, if the business sells pizzas, one item might be all that is required. As each invoice is created, the description and price could be revised as needed. The other alternative would be to create items for each different kind of pizza sold. This approach would eliminate the need for revisions as the invoice is created since the description and price would come up automatically. More sophisticated sales reports would also be possible in the latter example.

There are many judgment calls and different ways to achieve accurate general ledger results. Review of the item list is critical to:

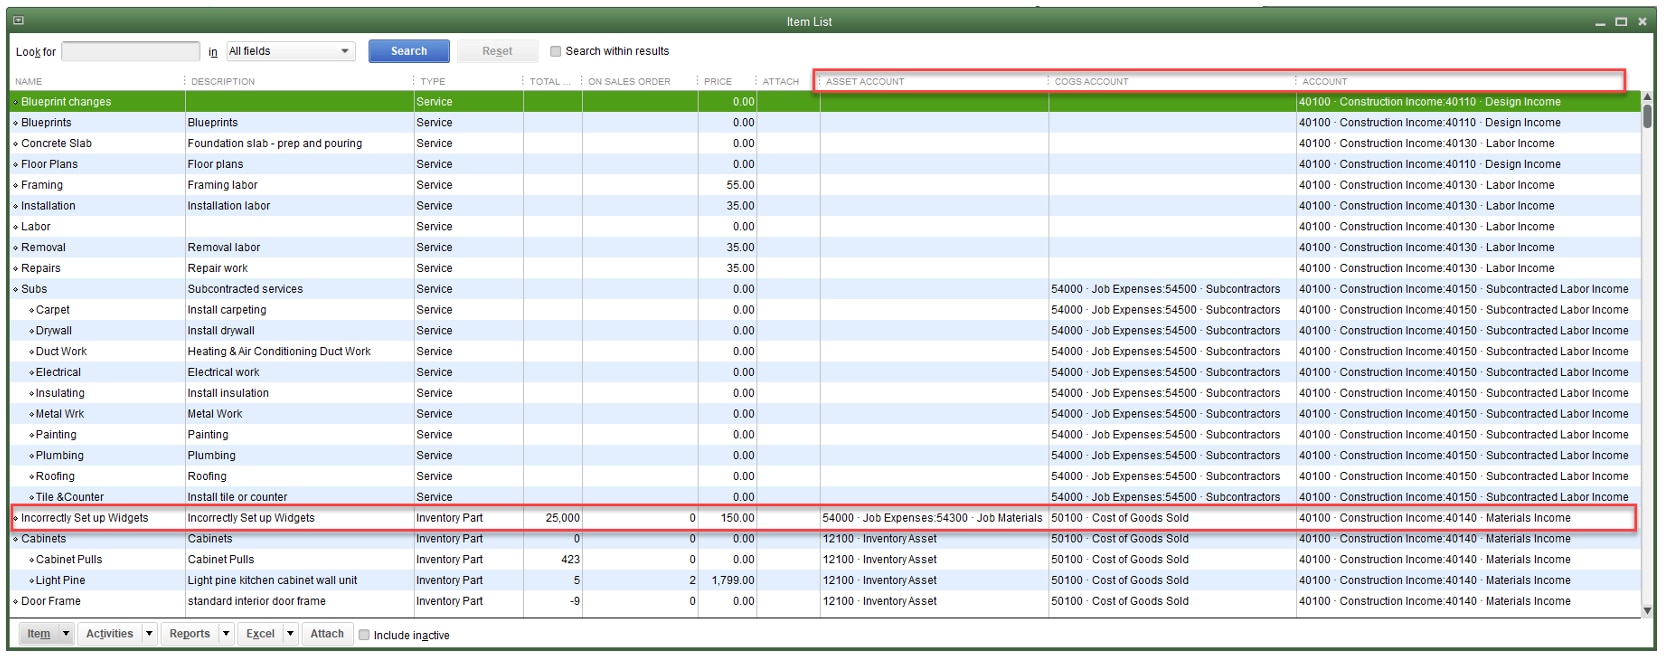
  • Confirm that the items have been set up correctly (such as inventory items mapped to the correct inventory asset account, cost of goods sold account, and income account, and
  • Confirm that the decisions made are appropriate for the business based on the flow of paperwork, accounting knowledge, QuickBooks experience, etc.
Common QuickBooks inventory accounting mistakes

The example above shows the Item list customized to display the asset account, COGS account, and (income) account. There is one item indicated which had the asset account mis-categorized as an expense type of account.

Item types

When creating an item, several choices of item types are available. The type is also important for subtotals on reports and for some function options.

Below is a list of the types and the typical use for each:

  • Service – most commonly used for items such as labor, consulting, hourly fees, etc. A service type item is required for use on timesheets.
  • Inventory Part – items normally carried in stock until sold. This item type will keep a running balance of quantity on hand and weighted average cost. When set up correctly, this item type will record purchases into an Other Current Asset account (inventory) when purchased and, when sold, record a corresponding entry with each invoice to record the appropriate amount to cost of goods sold. Further detailed discussion of this type of item is beyond the scope of these materials.
  • Inventory Assembly – items created from other items (i.e., assembled) and then carried in stock until sold. This item type will keep a running balance of quantity on hand and weighted average cost. When set up correctly, this item type will record purchases into an Other Current Asset account when purchased and, when sold, reclassify the appropriate amount to cost of goods sold. Further detailed discussion of this type of item is beyond the scope of these materials.
  • Non-Inventory Part – items not kept in stock. This could include items such as custom or special orders. A rule of thumb is that this type is used for items that are bought but not sold, or items that are sold but not bought. This item type is also used if the average cost method of valuing inventory is unacceptable or perpetual inventory counts are not necessary. As items are purchased, they are simply expensed.
  • Other Charge – freight, service charge, fuel surcharge, gift-wrapping services or other expenses that are passed through to the customer are all examples of other charge type items.
  • Subtotal – a special item type that permits a subtotal line on an invoice to accumulate the amount due of all lines entered previously.
  • Group – this item type is used when several items are sold at the same time (but aren’t built first as an assembly item). The group item adds flexibility for printing the individual components on the customer’s copy of the invoice, or showing the detail only on the screen with one line on the printed copy of the invoice that merges the detail together. Note: Reports cannot be run on groups by themselves. For example, if an installed door set (that includes a door, the hardware, and labor) is sold, a sales report will show the appropriate amount of revenue (and quantity sold) for each component but will not show the revenue generated from the sale of the door set group itself.
  • Discount – a reduction on the invoice that can be either a flat dollar amount or a percentage of the line immediately preceding it. If a discount is to be given on each item, a separate discount can be entered after each item, one discount only can be entered on the line after a subtotal of all items.
  • Payment – if a payment is received at the time of the invoice, this item type can be used. If the Client uses statements, then the statement will only show the net of the transaction, not the detail. If it is important to show the payment on the statement, entering an invoice then creating a receive payment transaction may be preferred. The Payment item type can also be used for clients whose customers prepay or make deposits.
  • Sales Tax – based on the customer being taxable, and the item being taxable, this item will calculate the tax liability due based on the tax percentage entered.
  • Sales Tax Group – a group of Sales Tax items that allows the business to show one tax rate, comprised of a state, county and/or local sales tax item, as an item on an invoice or sales receipt. Currently, a Sales Tax Group report is not available within QuickBooks. The absence of this report makes this item type not a preferred method for tracking sales tax.

Inventory versus non-inventory type parts

QuickBooks reports inventory based on weighted average cost (with the exception of QuickBooks Enterprise with Advanced Inventory enabled, which allows the user to select FIFO costing instead). QuickBooks tracks inventory well when set up correctly and proper procedures are followed consistently for buying, selling, and adjusting the inventory item balances. The premise behind this is properly setting up inventory versus non-inventory types.

The item types were defined above; however, a description of best practices is warranted.

With inventory, one item is coded to an asset, a cost of goods sold account, and an income account. As the items are purchased, they are recorded on the Items tab of a bill, check, or credit card charge) and the inventory balance is increased for the quantity and cost of the item. When the item is sold, the average cost is deducted from the inventory asset account and recorded in cost of goods sold. At the time of the purchase, the inventory account is debited and the bank account, accounts payable, or credit card account is credited. At the time of the sale, the entry that takes place behind the scenes of the sale transaction is a debit to accounts receivable, a credit to sales, a debit to cost of goods sold, and a credit to inventory at the weighted average cost computed by QuickBooks.

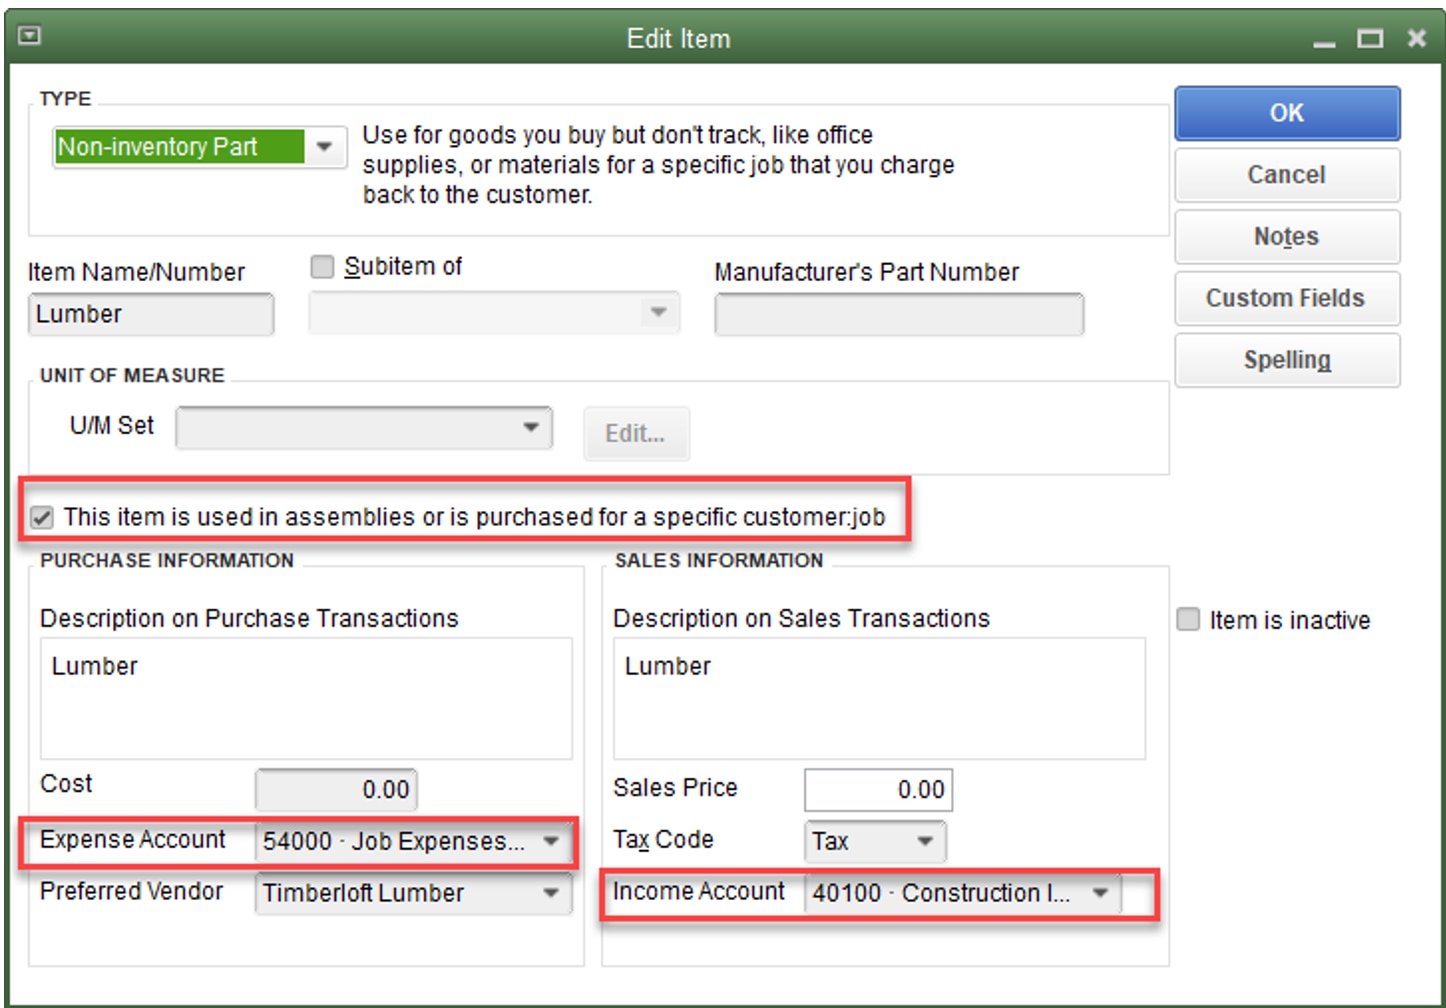
With non-inventory parts, you can choose to use one account for both the purchases and sales of each items. However, the item can be edited and the checkbox “This item is used in assemblies or is purchased for a specific customer:job” can be checked, turning it into a two-sided item. Information for both the purchase and the sale accounts related to this item can now be entered. With non-inventory type parts, the inventory account is not involved.

Common QuickBooks inventory accounting mistakes

Items can be changed for coding corrections, or to change a non-inventory part to inventory. Items cannot be changed from inventory to non-inventory. Make any changes carefully as these changes cannot be undone and could affect prior period balances.


The most important aspect of using inventory in QuickBooks is to ensure that items are purchased before they are sold. The client should understand the significance of negative inventory quantities. Warning messages about negative inventory should never be ignored. (And in QuickBooks Enterprise, users have the option to disallow transactions that result in negative inventory.)

Inventory purchases versus sales

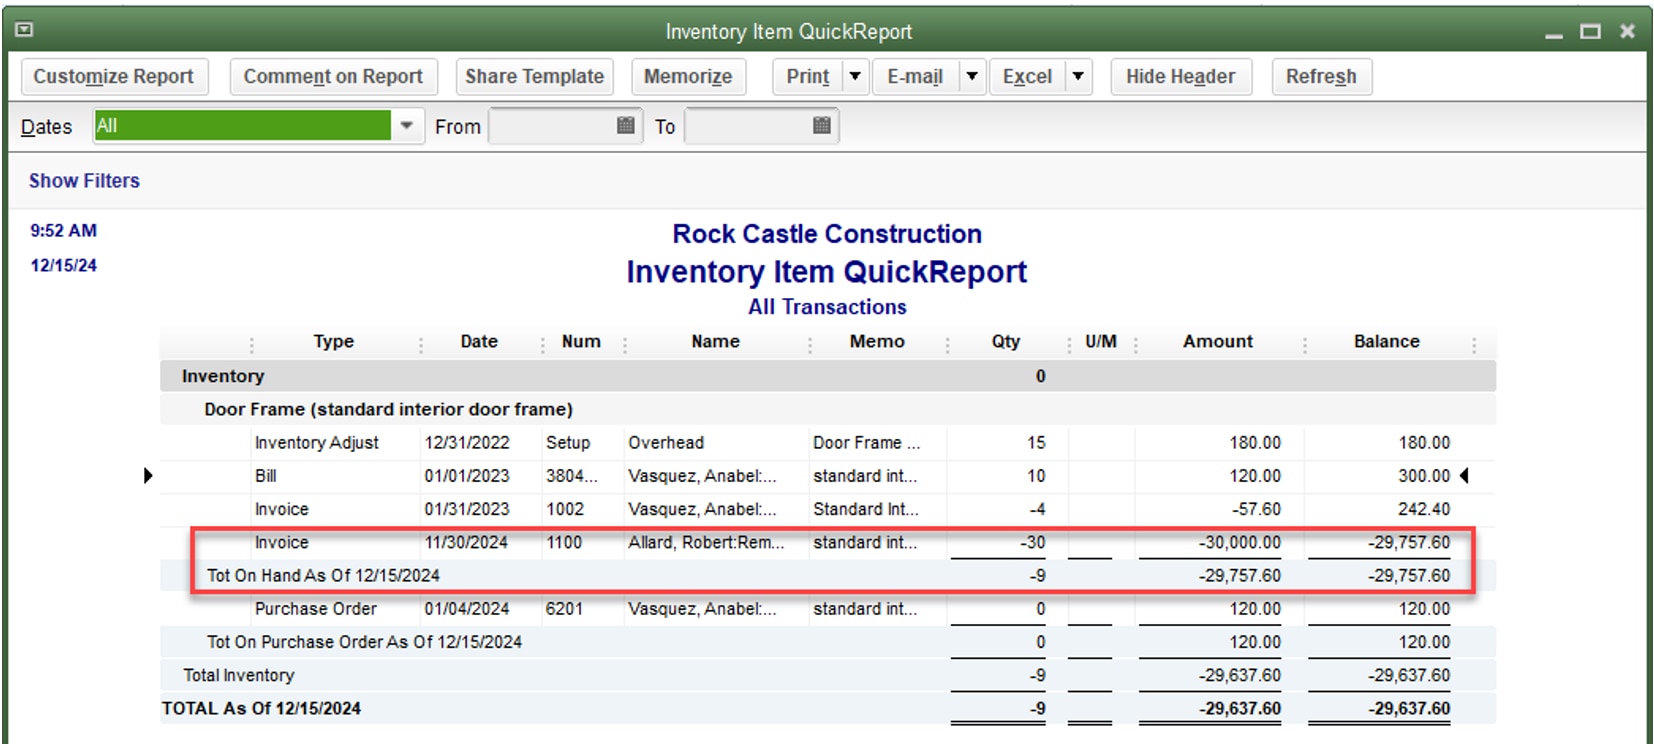
Perpetual inventory systems require adherence to proper procedures for accurate inventory control. Consistency in entering key transactions associated with the inventory items is key. An Item QuickReport (for All dates and with columns added for the Amount and Balance) is a quick way to confirm the item has only been sold when positive quantities on hand were showing.

Common QuickBooks inventory accounting mistakes

Item receipts

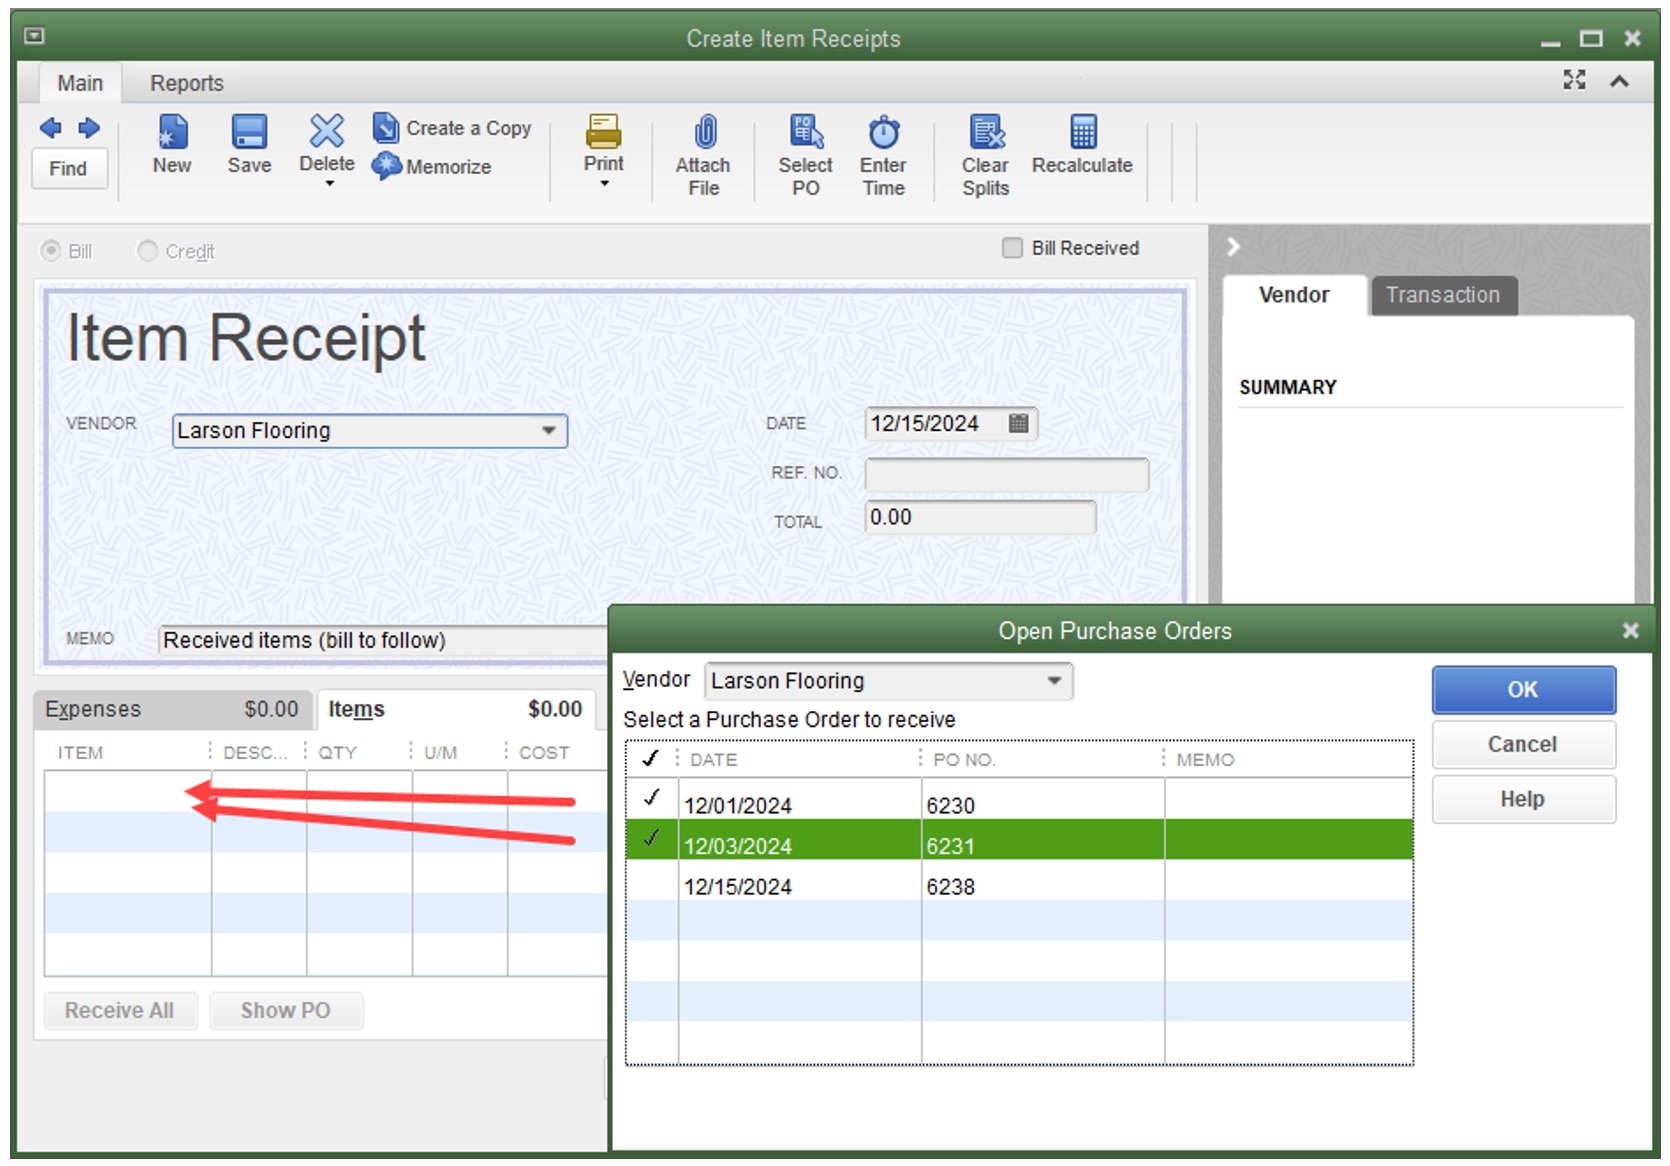
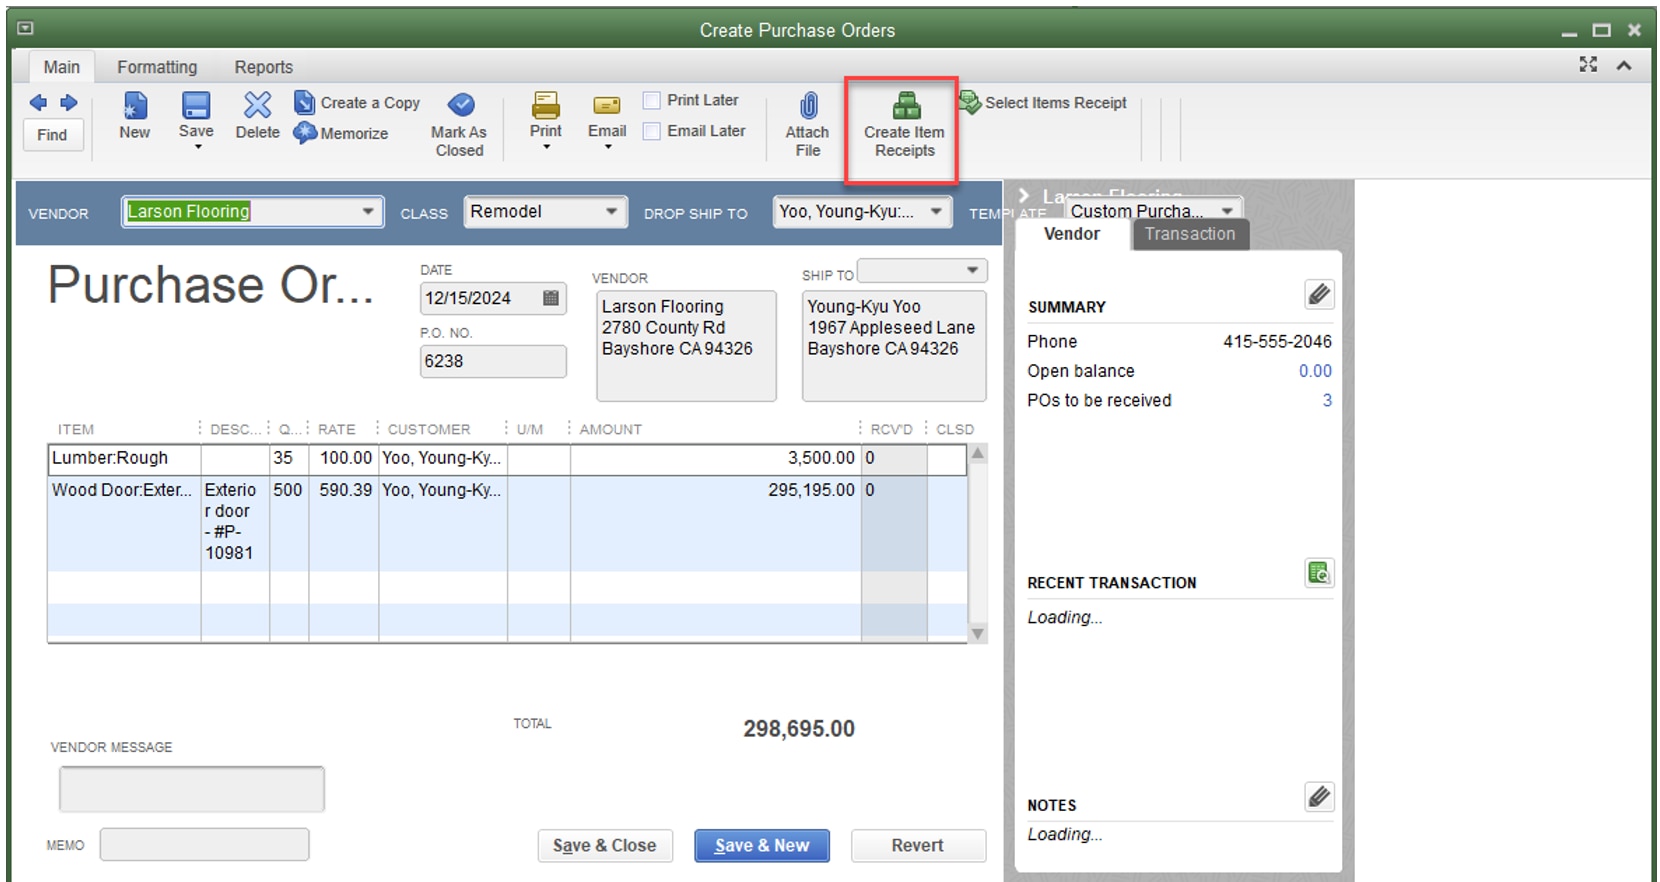
If an item has been received, but the bill has not arrived, an item receipt should be created. An item receipt will not age in Accounts Payable until the Item Receipt form is edited to indicate that the bill has been received. The item receipt will increase the Inventory and Accounts Payable balances, but it will not appear in the Pay Bills window. This Item Receipt can also be linked to a Purchase Order either when the vendor name is entered in the item receipt (and the Open Pos Exist window appears), or from the Create Item Receipts button in the Main ribbon at the top of the Purchase Order.

Common QuickBooks inventory accounting mistakes

If no Purchase Order exists, simply enter the information manually on the Items tab of the item receipt.


NOTE: When the bill is received, click on the box in the upper right-hand corner of the item receipt and the terms and due date fields will appear. This will activate proper aging and permit bill payment procedures. This step is important; if a new bill is entered in addition to the item receipt, rather than the item receipt being edited, the Inventory and Accounts Payable balances will be inflated. You can also achieve these same steps by entering a bill for items already received from the Home page. An error message helps warn when a bill is entered but an item receipt already exists.

Inventory quantity and/or value adjustments

To review the details of inventory values, select the Reports menu > Inventory > Inventory Valuation Summary. This report provides information about the quantity on hand as well as the value it is assigned in Inventory.

A person is using a computer to study a presentation.

QuickBooks uses weighted average costing for the inventory value (with the noted exception of using FIFO as an option in QuickBooks Enterprise with Advanced Inventory). The total asset value on this report should agree on the same date with the Balance Sheet value for Inventory.


Make sure that all inventory parts and inventory assembly items with quantities on hand are active as the Inventory Valuation Summary report will exclude any inactive items, even those with quantities and values.

Even if there are no inactive inventory parts or inventory assembly items with quantities and values, these numbers (comparing the Balance Sheet’s Inventory Asset balance and the Inventory Valuation Summary) can differ if users create journal entries (or other non-item-based transactions) and post them directly to the Inventory account. The inventory adjustment function should always be used to adjust inventory values rather than through a journal entry.

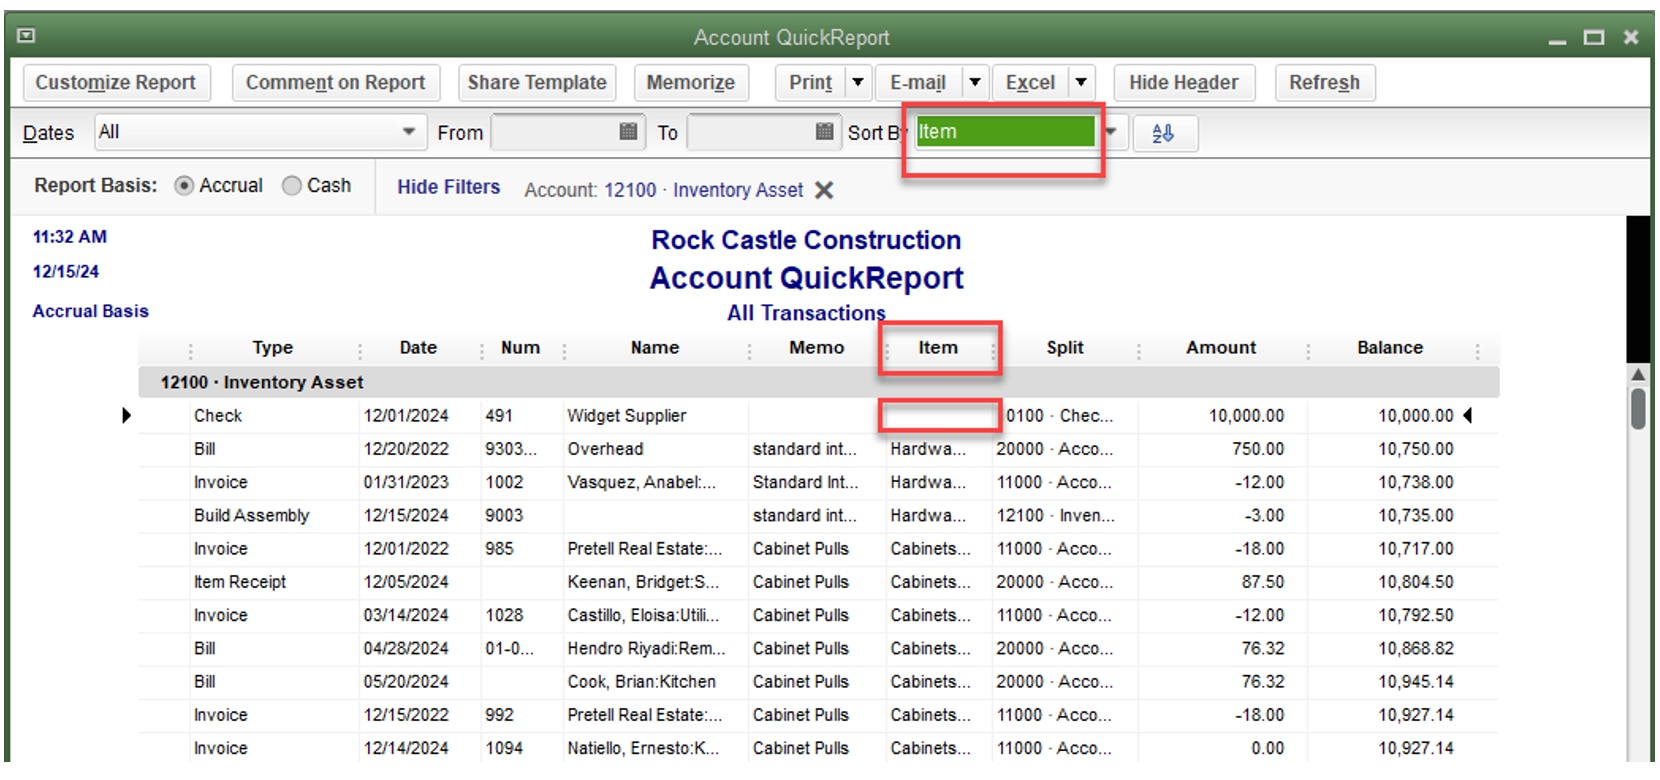
Create the following report to identify transactions that have been posted directly to the Inventory account. Chart of Accounts > Inventory Asset, select the Reports tab at the bottom of the screen, then select QuickReport > Customize Report (All dates already displays by default), and then add a column for Item. Then Sort By the Item column. Those transactions affecting the Inventory Asset account without an item will appear first.

Common QuickBooks inventory accounting mistakes

The correct process for adjusting inventory quantities, values, or both is to make a change to Inventory for quantity or value changes from Vendors > Inventory Activities > Adjust Quantity/Value on Hand.

Common QuickBooks inventory accounting mistakes

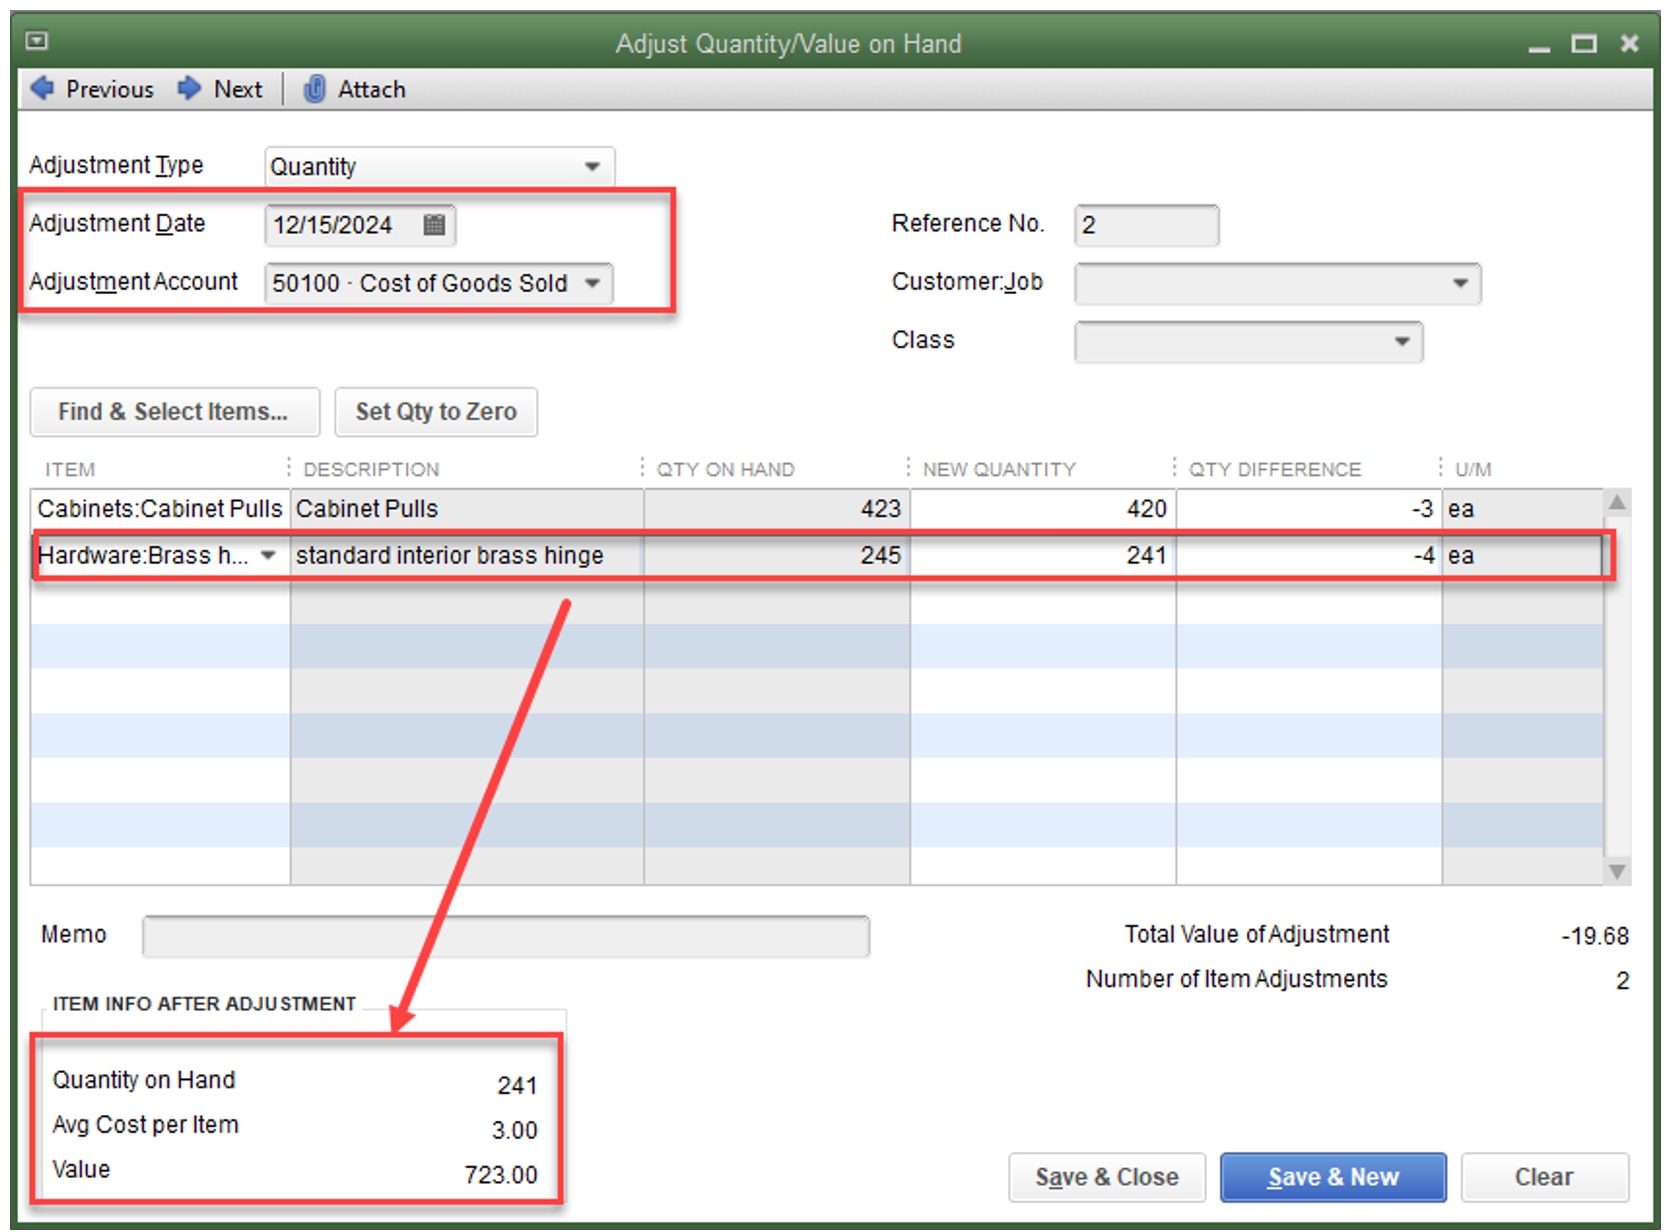
In this example, we are illustrating changing the quantity.


Make sure you have the Adjustment Date and Adjustment Account (in this example, we’ve chosen Cost of Goods Sold but we could have created a Shrinkage expense account). Then specify the items you want adjusted on that date. You’ll see the Qty on Hand per the QuickBooks records on that date, and you can enter either the correct New Quantity or the Qty Difference. When you populate the column of your choice, the other column will populate automatically.

How the change for a particular highlighted item will affect the inventory is shown in the lower left corner.


Recommended for you

Get the latest to your inbox

Get the latest product updates and certification news to help you grow your practice.

By clicking “Submit,” you agree to permit Intuit to contact you regarding QuickBooks and have read and acknowledge our Privacy Statement.

Thanks for subscribing.

Relevant resources to help start, run, and grow your business.

Looking for something else?

Get QuickBooks

Smart features made for your business. We've got you covered.

Tax Pro Center

Expert advice and resources for today’s accounting professionals.

QuickBooks Support

Get help with QuickBooks. Find articles, video tutorials, and more.

How can we help?
Talk to sales 1-800-497-1712

Monday - Friday, 5 AM to 6 PM PT

Get product support