Accountant improving the firm's workflow.
accounting

QuickBooks Online usage limits: How to help clients clean up QBO and stay under limits

Lately, we are all seeing “usage limit” notifications in QuickBooks® Online (QBO). I’ll bet that your team and some of your clients are asking questions. What does this mean? Does my client need to upgrade?


Well, the answer is probably not. QBO Advanced is intended for the #QBOPowerUser, and not all of our clients fit this model. As a matter of fact, only 5 percent of QBO users are above the usage threshold.


First, let’s define the “QBOPowerUser.” There are two versions of this incredible business person:


The delegator:


  • Complex business needs.
  • Needs to simplify workflows.
  • Has to delegate work.
  • More users than the average business.
  • Requires more granular user permissions.
  • 10-100 employees.

The center of operations:


  • Double the time spent in QBO than the average user.
  • Two times the data (transaction lines) in QBO then the average business.
  • More users than the average business.
  • Requires more granular user permissions.
  • 10-100 employees.

If any of your clients sound like one of these #QBOPowerUsers, then they are probably a natural candidate for QBO Advanced.

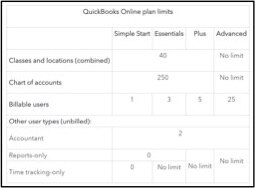
For the rest of our clients, we need to manage their usage and keep things in check. Here is a chart showing what the limits are in the four QBO offerings.


Only active accounts, classes and locations count towards the limit. Also, only billable users count as well. This means it can be managed. Billable users are user seats intended for the client’s use, including the Master Admin user. “Accountant users” are not billable.

Four steps to keeping clients below usage limits

So, how do we keep our clients from exceeding their usage limits in QBO? Just follow these next 4 steps!


#1: Check usage:


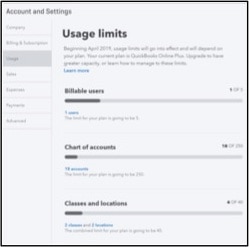
You or your client should periodically be checking the new Usage tab. By the way, monitoring usage could be a nice value to add to your existing tax or accounting clients.

Start by navigating to the new Usage tab:


Select the Gear icon on the Toolbar.

Under Account & Settings, select Usage.

From here, you can see exactly where your client stands with regard to Billable User, Chart of Accounts and Classes and Locations limits.

PRO-TIP: Intuit® is now embedding list warnings in QBO so we can tell exactly where our client’s list counts are – without accessing Account and settings. This is a great way to stay on top of a client’s database as well.

Now that we know how to discover any potential usage issues, how do we manage the lists in order to keep them clean and under the limit? If you are unfamiliar with the process of making list items inactive, merging or deleting them, it is relatively simple and we will walk you through using these tools to keep our client’s database beneath usage thresholds.


#2: Managing billable users: The User list is likely to be one of the first limits our clients will reach. Only “billable” users count toward the usage limit. QBO Plus has a five user limit, making this list very manageable.


Here’s how. First, you must be an Accountant user, Master administrator* or Company administrator in order to add, delete, or change a user’s access. Note: a Master administrator is a billable user in QBO. Changing user access is not a recommended option for switching out users in QBO (in the case of an employee who leaves and is replaced by a new one, for example). For audit log integrity, it is best to delete the out-going user then add a new user as instructed below.


Start by navigating to the Manage Users section:


Select the Gear icon on the Toolbar.

Under Your Company, select Manage Users.

From here you can add or delete users.

To delete a user:


Find the name of the user you want to delete.

From the Action drop-down, choose Delete.

To add a new user:


On the upper right, select Add user.

Now that we know how to discover any potential usage issues, how do we manage the lists in order to keep them clean and under the limit? If you are unfamiliar with the process of making list items inactive, merging or deleting them, it is relatively simple and we will walk you through using these tools to keep our client’s database beneath usage thresholds.


#2: Managing billable users: The User list is likely to be one of the first limits our clients will reach. Only “billable” users count toward the usage limit. QBO Plus has a five user limit, making this list very manageable.


Here’s how. First, you must be an Accountant user, Master administrator* or Company administrator in order to add, delete, or change a user’s access. Note: a Master administrator is a billable user in QBO. Changing user access is not a recommended option for switching out users in QBO (in the case of an employee who leaves and is replaced by a new one, for example). For audit log integrity, it is best to delete the out-going user then add a new user as instructed below.


Start by navigating to the Manage Users section:


Select the Gear icon on the Toolbar.

Under Your Company, select Manage Users.

From here you can add or delete users.

PRO-TIP: Some accountant users may also hold the Master Admin seat. You can check for this duplicated user in GEAR > Manage Users. You should then transfer that seat to your client in order to open up that billable user seat. For instructions on how to transfer the role of Master administrator, check out how to transfer the role of Master administrator.

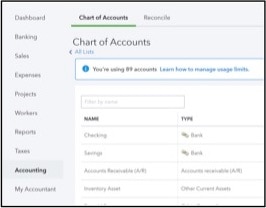
#3: Managing the Chart of Accounts: QBO allows you to “hide” or “make inactive” accounts that are not in use. When an account is inactive, that account does not count against usage limits – and that’s a good thing. It is also a good idea to review the Chart of Accounts to make sure there are no unnecessary or duplicated categories. If you find duplicated categories, you can merge the two into one.


Start by navigating to the client’s Chart of Accounts:


Select the Gear icon on the Toolbar.

Select Chart of Accounts.

From here, you can make accounts inactive and merge duplicate accounts.

To make an account inactive:


Find the account you wish to delete.

In the Action column, select the drop-down, then Make inactive.

Select Yes to confirm.

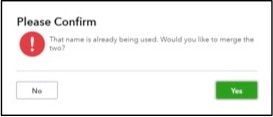
To merge duplicate accounts:


  • Find the account you wish to merge.
  • In the Action column, select the drop-down, then Edit.
  • In the Account Type field, select the type that is a match to the account you want to merge with.
  • In the Name field change the text to match the account you want to merge with.
  • Verify that the Detail Type is identical to the account you want to merge with.
  • Click Save and close.
  • Confirm that you wish to merge the two accounts.


PRO-TIP: There are some default accounts created by QuickBooks according to company preferences. You can not make these accounts inactive. Learn how to manage these accounts if they’re no longer in use.


PRO TIP: Be cautious when making balance sheet accounts inactive. These accounts can be easily identified by the “View Register” option in the Action column. If there is a balance in the account and it is made inactive, QBO will post a journal entry to zero out the balance against Opening Balance Equity. You should adjust the account to zero before making it inactive.


#4: Managing Classes & Locations: To add, delete, and modify classes or locations, you must be an Accountant User, Master Administrator, Company Administrator or the appropriate Custom User access. Managing these lists is quite easy. If you need to make changes, navigate to GEAR > Lists > All Lists.


Start by navigating to the Classes or Locations section:


  • Select the Gear icon on the Toolbar.
  • Under Lists, select All Lists.
  • Choose Classes or Locations
  • From here you can now edit or merge duplicate classes and locations. You can also make classes and locations inactive.

Edit a class or location:


From the drop-down under the Action column, choose Edit.

Edit the desired information, then choose Save. The location and class will now be removed from the Classes or Locations list or updated with the desired information.

Merge duplicate classes or locations:


  • From the drop-down under the Action column, choose Edit.
  • In the “Name” field, change the name to the name you wish to merge into, then choose Save. The location or class will now be removed and activity merged to the remaining name.

Make a class or location inactive:


  • From the drop-down under the Action column, choose Make inactive.

PRO-TIP: Projects is a new feature in QBO Plus that helps organize all the moving pieces of a project, including transactions, time, and running reports. Adding a Project to QBO creates a list of sub customers in the Customer Center and also a corresponding list of Projects in the new Projects Center. While these are indeed lists, they do not affect usage limits in QBO.


The Projects feature can be used as an alternative for the many QBO who users have been using Classes and Locations to track profitability by job. Because Projects is now available, we can guide our clients away from using valuable usage space and to adopt Projects instead.


Take these steps to manage your client’s usage so they do not unnecessarily upgrade to QuickBooks Online Advanced. We can also leverage usage limits to track the growth of our client’s database.


Some of you may have a #QBOPowerUser or two on the horizon. That is the wonderful thing about QBO Advanced: This powerful new offering can now grow with our clients as they are scaling from a small to mid-sized business.

Get the latest to your inbox

Get the latest product updates and certification news to help you grow your practice.

By clicking “Submit,” you agree to permit Intuit to contact you regarding QuickBooks and have read and acknowledge our Privacy Statement.

Thanks for subscribing.

Relevant resources to help start, run, and grow your business.

Looking for something else?

Get QuickBooks

Smart features made for your business. We've got you covered.

Tax Pro Center

Expert advice and resources for today’s accounting professionals.

QuickBooks Support

Get help with QuickBooks. Find articles, video tutorials, and more.

How can we help?
Talk to sales 1-800-497-1712

Monday - Friday, 5 AM to 6 PM PT

Get product support